mapredv1 架构分析
简单而有效的哲学
mapreduce 的算法思想就是分治算法,计算任务不是单机的多线程并行处理,而是扩展到多台机器并行处理,分治算法是计算机科学的一种非常重要的算法,这种算法其实我们生活中到处都是,也很容易想到,当一个任务可以拆分成互相无关的相同的子任务的时候,我们就可以使用分治算法,任务从单机扩展到多机其实也是自然而然的想法,例如数组求和,人口统计。
框架对外提供一种抽象接口,即 Map 和 Reduce 接口,用户通过该接口编写 mapred 程序,数据被分块并行处理, 这已经被大多数博客讲烂了,也就是所谓的 mapreduce 编程模型,这是 mapreduce 系统的编程范式,你需要想办法把你的作业拆分成多个map任务和reduce任务来完成。wordcount也是hadoop最初提供的例子了。
mapreduce 的工程背后,其实蕴含了Unix Pipe的系统哲学。我们来看一个数据处理的例子。假设你有如下nginx 日志,其中一行:
216.58.210.78 - - [27/Feb/2015:17:55:11 +0000] "GET /2018/01/01/thread-local-storage/ HTTP/1.1"
200 3377 "http://blog.hacksmeta.com/" "Mozilla/5.0 (Macintosh; Intel Mac OS X
10_9_5) AppleWebKit/537.36 (KHTML, like Gecko) Chrome/40.0.2214.115
Safari/537.36"
日志的结构解析定义如下,
$remote_addr - $remote_user [$time_local] "$request"
$status $body_bytes_sent "$http_referer" "$http_user_agent"
如果要统计网站页面访问次数前五的页面,
unix chain
再unix中可以使用 Unix Pipe 工具
cat /var/log/nginx/access.log |
 awk '{print $7}'   |
 sort               |
 uniq -c            |
 sort -r -n         |
 head -n 5
cat读取日志文件awk把每一行日志拆分成结构字段,并只输出第七个字段即 request urlsort按照字母标顺序给 url 排序uniq可以通过检查相邻行是否相同来过滤重复的行,-c选项要求同时输出每个唯一的url重复出现次数sort再次按照出现在每一行的数字排序,-n表示按照数字排序,-r表示倒序head显示前 5 行
自定义程序
如果采用自定义程序,则可以使用 比如Python
counter = {}
with open('/var/log/nginx/access.log') as f:
    for line in f:
        fields = line.split(' ')
        url = fields[7]
        counter[url] += 1
top5 = sorted(countser.items(), key=lambda x:x[1], reverse=True)[5]
for key, value in top5:
    print key, value
对于自定义 python 脚本,采用了 hash 表存储不同的url,如果distinct url 非常多,那么hash table可能就存不下了。 但是对于 unix sort 方法可以支持比内存还大的排序的。而且 sort 经过优化,可以将超出内存的数据溢出磁盘,并利用多核排序, unix 命令形式是可以轻松扩展到大数据集的,瓶颈可能在于文件被读取的速率。
从以上例子,可以看到 Unix 系统的这种设计理念。 Unix pipes 的发明人 Doug McIlroy 描述:
“We should have some ways of connecting programs like [a] garden hose—screw in another segment when it becomes necessary to massage data in another way. This is the way of I/O also.”
统一接口
通过接口把一个程序的输出连接到另一个程序的输入,而在 Unix 系统种,接口就是 file。file 也是 Unix 对一切设备的抽象,file 可以认为就是一串有序字节。而在 Mapreduce 系统中,接口也是文件,是分布式文件系统 hdfs 提供的文件。 Job 和 Job 之间,或者 Map 和 Reduce 之间都是通过 hdfs 文件连接起来。
逻辑和结构分离
Unix pipes 的控制结构不用改变,通过标准输入输出,我们就可以再 shell 中将程序连接起来,程序逻辑由用户自己实现,只需要支持标准输入输出即可。Mapreduce 系统种的 mapper 和 reducer 程序都是由用户自定义的,而这中间的连接过程是由 系统自己控制的。系统通过回调函数 map 和 reduce 来实现运行用户自定义mapper 和 reducer 代码。 具体到 Java 代码,就是通过设置好 Mapper 和 Reducer 类,然后JVM 会通过类加载器和反射来拿到具体实现类。
//旧API作业配置实例:
JobConf job=new JobConf(new Configuration(), MyJob.class) ;
job.setJobName("myjob") ;
job.setMapperClass(MyJob.MyMapper.class) ;
job.setReducerClass(MyJob.MyReducer.class) ;
JobClient.runJob(job) ;
//新API作业配置实例:
Configuration conf=new Configuration();
Job job=new Job(conf, "myjob") ;
job.setJarByClass(MyJob.class) ;
job.setMapperClass(MyJob.MyMapper.class) ;
job.setReducerClass(MyJob.MyReducer.class) ;
System.exit(job.waitForCompletion(true) ?0: 1) ;
对于 hadoop stream 这种实现也很简单,运行自定义的 mapper 和 reducer 脚本其实是通过框架自定义的实现 map 方法的 mapper 封装类,通过启动子进程的方式执行可执行的脚本文件。
Hadoop Streaming工具包实际上是一个使用Java编写的MapReduce作业。 当用户使用可执行文件或者脚本文件充当Mapper或者Reducer时, Java端的Mapper或者Reducer充当了wrapper角色, 它们将输入文件中的key和value直接传递给可执行文件或者脚本文件进行处理, 并将处理结果写入HDFS;
//将wc_mapper封装成一个进程
ProcessBuilder builder=new ProcessBuilder("wc_mapper");
builder.environment().putAll(childEnv.toMap()); //设置环境变量
sim=builder.start();
//创建标准输出流
clientOut_=new DataOutputStream(new BufferedOutputStream(
sim.getOutputStream(), BUFFER_SIZE));
//创建标准输入流
clientIn_=new DataInputStream(new BufferedInputStream(
sim.getInputStream(), BUFFER_SIZE));
//创建标准错误流
clientErr_=new DataInputStream(new BufferedInputStream(sim.getErrorStream()));
,而框架本身需要屏蔽底层网络通讯,多机器管理,任务分发,容错等细节。hadoop 1.0.0 主要是 hdfs 分布式文件系统和 mapreduce 分布式计算框架两部分。
作业提交流程分析
用户可以采用命令行的方式提交作业,对于 java 作业,一般会打包成 jar 包,通过以下命令提交作业:
$HADOOP_HOME/bin/hadoop jar xxx.jar\
-D mapred.job.name="xxx"\
-D mapred.reduce.tasks=2\
-files=blacklist.txt, whitelist.txt\
-libjars=third-party.jar\
-archives=dictionary.zip\
-input/test/input\
-output/test/output
实际上$HADOOP_HOME/bin/hadoop 脚本中,会从 runJar 类通过反射机制和类加载器开始运行作业。
  #core commands
  *)
    # the core commands
    ...
    elif [ "$COMMAND" = "jar" ] ; then
      CLASS=org.apache.hadoop.util.RunJar
      if [[ -n "${YARN_OPTS}" ]] || [[ -n "${YARN_CLIENT_OPTS}" ]]; then
        echo "WARNING: Use \"yarn jar\" to launch YARN applications." 1>&2
      fi
    ...
    export CLASSPATH=$CLASSPATH
    exec "$JAVA" $JAVA_HEAP_MAX $HADOOP_OPTS $CLASS "$@"
    ;;
org.apache.hadoop.util.RunJar 类的代码如下,通过解压 jar 文件,然后通过类加载器将主类加载进来,在通过反射机制运行主类的main方法,开始执行用户所编写的 mapred 程序。
  /** Run a Hadoop job jar.  If the main class is not in the jar's manifest,
   * then it must be provided on the command line. */
  public static void main(String[] args) throws Throwable {
    String usage = "RunJar jarFile [mainClass] args...";

    if (args.length < 1) {
      System.err.println(usage);
      System.exit(-1);
    }

    int firstArg = 0;
    String fileName = args[firstArg++];
    File file = new File(fileName);
    String mainClassName = null;

    JarFile jarFile;
    try {
      jarFile = new JarFile(fileName);
    } catch(IOException io) {
      throw new IOException("Error opening job jar: " + fileName)
        .initCause(io);
    }
    // 解析参数,获取主类名称
    Manifest manifest = jarFile.getManifest();
    if (manifest != null) {
      mainClassName = manifest.getMainAttributes().getValue("Main-Class");
    }
    jarFile.close();

    if (mainClassName == null) {
      if (args.length < 2) {
        System.err.println(usage);
        System.exit(-1);
      }
      mainClassName = args[firstArg++];
    }
    mainClassName = mainClassName.replaceAll("/", ".");
    // 创建临时目录,用来存放解压 jar 包类文件
    File tmpDir = new File(new Configuration().get("hadoop.tmp.dir"));
    tmpDir.mkdirs();
    if (!tmpDir.isDirectory()) {
      System.err.println("Mkdirs failed to create " + tmpDir);
      System.exit(-1);
    }
    final File workDir = File.createTempFile("hadoop-unjar", "", tmpDir);
    workDir.delete();
    workDir.mkdirs();
    if (!workDir.isDirectory()) {
      System.err.println("Mkdirs failed to create " + workDir);
      System.exit(-1);
    }

    // 设置虚拟机hook,关闭时删除临时文件
    Runtime.getRuntime().addShutdownHook(new Thread() {
        public void run() {
          try {
            FileUtil.fullyDelete(workDir);
          } catch (IOException e) {
          }
        }
      });

    // 解压
    unJar(file, workDir);

    // 设置环境变量,ClassPath
    ArrayList<URL> classPath = new ArrayList<URL>();
    classPath.add(new File(workDir+"/").toURL());
    classPath.add(file.toURL());
    classPath.add(new File(workDir, "classes/").toURL());
    File[] libs = new File(workDir, "lib").listFiles();
    if (libs != null) {
      for (int i = 0; i < libs.length; i++) {
        classPath.add(libs[i].toURL());
      }
    }

    ClassLoader loader =
      new URLClassLoader(classPath.toArray(new URL[0]));
    // 加载主类,并利用反射开始运行main方法
    Thread.currentThread().setContextClassLoader(loader);
    Class<?> mainClass = Class.forName(mainClassName, true, loader);
    Method main = mainClass.getMethod("main", new Class[] {
      Array.newInstance(String.class, 0).getClass()
    });
    String[] newArgs = Arrays.asList(args)
      .subList(firstArg, args.length).toArray(new String[0]);
    try {
      main.invoke(null, new Object[] { newArgs });
    } catch (InvocationTargetException e) {
      throw e.getTargetException();
    }
  }
而对于用户的 mapred 应用程序,因为他是遵循严格的 map/reduce 接口范式实现的,主方法通过通过 mapred 框架提供的 Job API,设置好了, 这里需要读者理清你的代码和框架代码是如何合作工作起来的。理解了这一点,可以加深对物理视图,逻辑视图,执行视图,部署视图的理解。
在代码层面,由于接口和多态的存在,mapred 不用担心具体是何种 mapper/reducer, 只要实现了框架中的 map/reduce 接口(旧API采用的是实现接口,旧API在 org.apache.hadoop.mapred 包中,新API采用的是继承抽象类,新API都在 org.apache.hadoop.mapreduce 包中). 对于mapper/reducer新旧API的兼容, 主要在 MapTask 类中,有一个判断使用新旧API的条件,通过JobConf中的参数 mapred.mapper.new-api 来设置。在 MapTask 的 run 方法中
  if (useNewApi) {
    runNewMapper(job, splitMetaInfo, umbilical, reporter);
  } else {
    runOldMapper(job, splitMetaInfo, umbilical, reporter);
  }
  done(umbilical, reporter);
为什么设计了新API?
1. 接口具有严格约束,子类必须实现所有方法。抽象类是宽松约束,可提供方法默认实现,子类可选择。因此,抽象类在类衍化方面更具有优势,抽象类具有良好的后向兼容性。当需要为抽象类添加新的方法时,只要新添加的方法提供了默认实现,用户之前的代码就不必修改。
2. 上下文封装,将变量和函数封装成各种上下文类,使得API具有更好的易用性和扩展性。这种设计在很多系统中都可以看到。首先,函数参数列表经过封装后变得更短,使得函数更易使用;其次,当需要修改或添加某些变量或函数时,只需要修改封装后的上下文,用户代码无需修改,这也保证了后向兼容性,同时具备扩展性。
MapReduce提供了两个MapRunnable实现, 分别是MapRunner和MultithreadedMapRunner, 其中MapRunner为默认实现。MultithreadedMapRunner实现了一种多线程的MapRunnable。 默认情况下, 每个Mapper启动10个线程, 通常用于非CPU类型的作业以提供吞吐率
Task 在 TaskTracker 中的提交运行时序
TaskTracker 主动请求TaskScheduler 分配 Task, 获取分配到的 Tasks 后,TaskTracker 新建 TaskInProgress 数据结构开始控制 Tasks 的实际运行。
需要注意的是,JobTracker 中有一个 org.apache.hadoop.mapred.TaskInProgress 类和 org.apache.hadoop.mapred.TaskTracker.TaskInProgress 类不是同一个。
TaskTracker 中的形成的一个 TIP 实体,其实只是 JobTracker 中TaskInProgress的一个 TaskAttempt 任务, 是TaskInProgress 的一次任务尝试, 该尝试任务 Task(MapTask/ReduceTask) 会装入TaskAction 一起序列化通过RPC 从 JobTracker 流入 TaskTracker, TaskTracker 利用自己的org.apache.hadoop.mapred.TaskTracker.TaskInProgress 对 Task 进行重新封装,该内部TIP包含 Task, TaskRunner, TaskLauncher, TaskStatus 是Task真实运行状态和行为控制的数据结构,JobTracker 中的 org.apache.hadoop.mapred.TaskInProgress 只是含有一些运行过程的数据。
下图是 Tasks 在 TaskTracker 上的运行过程时序图,TaskTracker 启动mapLauncher 和 reduceLauncher 两个TaskLauncher 守候线程,以及MapEventsFetcherThread(获取map task 完成进度)线程等,进入 offerService 主循环。offerService 是 TaskTracker 主循环体,循环发送heartBeat给JobTracker并获取tasks和指令。
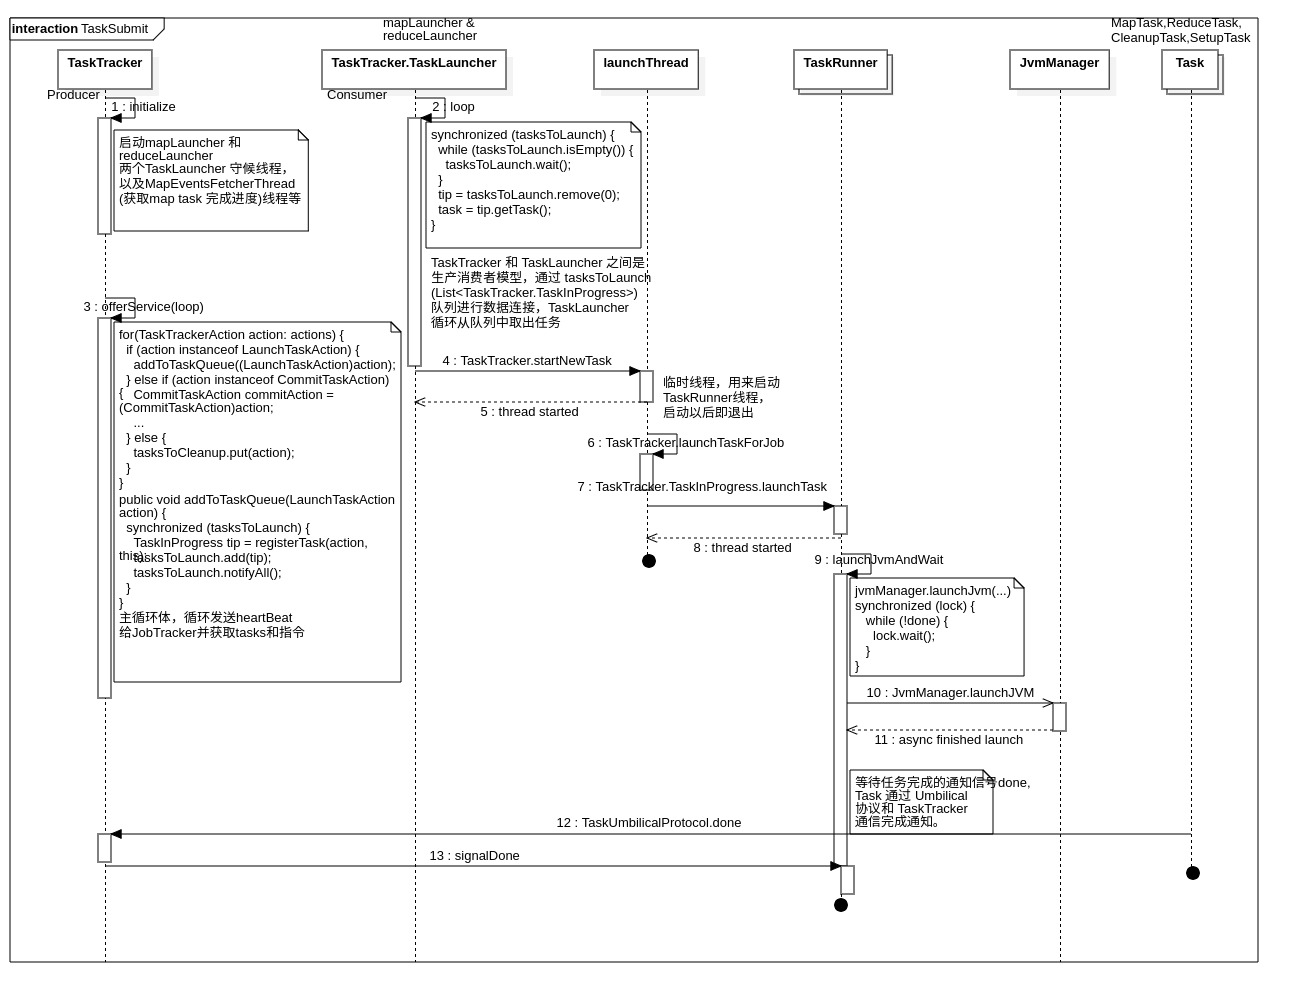
TaskTracker 和 TaskLauncher 之间是生产消费者模型,通过 tasksToLaunch(List
生产消费者模型所采用的方式是 wait/notify 的方式。
// 生产者 TaskTracker
public void addToTaskQueue(LaunchTaskAction action) {
  synchronized (tasksToLaunch) {
    TaskInProgress tip = registerTask(action, this);
    tasksToLaunch.add(tip);
    tasksToLaunch.notifyAll();
  }
}
private TaskInProgress registerTask(LaunchTaskAction action,
      TaskLauncher launcher) {
  Task t = action.getTask();
  LOG.info("LaunchTaskAction (registerTask): " + t.getTaskID() +
            " task's state:" + t.getState());
  TaskInProgress tip = new TaskInProgress(t, this.fConf, launcher);
  synchronized (this) {
    tasks.put(t.getTaskID(), tip);
    runningTasks.put(t.getTaskID(), tip);
    boolean isMap = t.isMapTask();
    if (isMap) {
      mapTotal++;
    } else {
      reduceTotal++;
    }
  }
  return tip;
}
消费者代码如下:
// 消费者 TaskLauncher
public void run() {
  while (!Thread.interrupted()) {
      TaskInProgress tip;
      Task task;
      synchronized (tasksToLaunch) {
        while (tasksToLaunch.isEmpty()) {
          tasksToLaunch.wait();
        }
        //get the TIP
        tip = tasksToLaunch.remove(0);
        task = tip.getTask();
        LOG.info("Trying to launch : " + tip.getTask().getTaskID() +
                  " which needs " + task.getNumSlotsRequired() + " slots");
      }
      //wait for free slots to run
      synchronized (numFreeSlots) {
        boolean canLaunch = true;
        while (numFreeSlots.get() < task.getNumSlotsRequired()) {
          //Make sure that there is no kill task action for this task!
          //We are not locking tip here, because it would reverse the
          //locking order!
          //Also, Lock for the tip is not required here! because :
          // 1. runState of TaskStatus is volatile
          // 2. Any notification is not missed because notification is
          // synchronized on numFreeSlots. So, while we are doing the check,
          // if the tip is half way through the kill(), we don't miss
          // notification for the following wait().
          if (!tip.canBeLaunched()) {
            //got killed externally while still in the launcher queue
            LOG.info("Not blocking slots for " + task.getTaskID()
                + " as it got killed externally. Task's state is "
                + tip.getRunState());
            canLaunch = false;
            break;
          }
          LOG.info("TaskLauncher : Waiting for " + task.getNumSlotsRequired() +
                    " to launch " + task.getTaskID() + ", currently we have " +
                    numFreeSlots.get() + " free slots");
          numFreeSlots.wait();
        }
        if (!canLaunch) {
          continue;
        }
        LOG.info("In TaskLauncher, current free slots : " + numFreeSlots.get()+
                  " and trying to launch "+tip.getTask().getTaskID() +
                  " which needs " + task.getNumSlotsRequired() + " slots");
        numFreeSlots.set(numFreeSlots.get() - task.getNumSlotsRequired());
        assert (numFreeSlots.get() >= 0);
      }
      synchronized (tip) {
        //to make sure that there is no kill task action for this
        if (!tip.canBeLaunched()) {
          //got killed externally while still in the launcher queue
          LOG.info("Not launching task " + task.getTaskID() + " as it got"
            + " killed externally. Task's state is " + tip.getRunState());
          addFreeSlots(task.getNumSlotsRequired());
          continue;
        }
        tip.slotTaken = true;
      }
      //got a free slot. launch the task
      startNewTask(tip);
  }
}
startNewTask 会启动一个临时线程,用来启动TaskRunner线程,启动TaskRunner以后即退出。
TaskRunner 线程会调用 launchJvmAndWait 阻塞函数,等待任务完成的通知信号done. TaskRunner 将任务交给 JvmManager 后,就会阻塞在这里。
jvmManager.launchJvm(...)
synchronized (lock) {
  while (!done) {
    lock.wait();
  }
}
Task 完成以后通过 TaskUmbilicalProtocol 协议和 TaskTracker 完成通知。这里只看 MapTask 的运行代码,通过调用 MapTask.done --> MapTask.sendDone --> TaskTracker.done(RPC) 来完成通知过程。
// MapTask.run()
if (useNewApi) {
  runNewMapper(job, splitMetaInfo, umbilical, reporter);
} else {
  runOldMapper(job, splitMetaInfo, umbilical, reporter);
}
done(umbilical, reporter);


// Task.done
if (commitRequired) {
  int retries = MAX_RETRIES;
  setState(TaskStatus.State.COMMIT_PENDING);
  // say the task tracker that task is commit pending
  while (true) {
    try {
      umbilical.commitPending(taskId, taskStatus, jvmContext);
      break;
    } catch (IOException ie) {
      if (--retries == 0) {
        System.exit(67);
      }
    }
  }
  commit(umbilical, reporter, committer);
}
taskDone.set(true);
reporter.stopCommunicationThread();
sendLastUpdate(umbilical);
//signal the tasktracker that we are done
sendDone(umbilical);


// Task.sendDone
int retries = MAX_RETRIES;
while (true) {
  try {
    umbilical.done(getTaskID(), jvmContext);
    return;
  } catch (IOException ie) {
    if (--retries == 0) {
      throw ie;
    }
  }
}
RPC 协议 TaskUmbilicalProtocol 中的 TaskTracker.done 方法,通知到 TaskRunner.
//TaskTracker.done
validateJVM(tip, jvmContext, taskid);
commitResponses.remove(taskid);
tip.reportDone();
//-----------------------------------------
// TaskTracker.TaskInProgress.reportDone()
this.taskStatus.setProgress(1.0f);
this.taskStatus.setFinishTime(System.currentTimeMillis());
this.done = true;
jvmManager.taskFinished(runner);
runner.signalDone();
任务都是丢给 JvmManager 来管理和运行的,JvmManager 分别对MapTask和ReduceTask进行管理,内部实现类似于线程池,每个JVM都通过一个JvmRunner线程来维护。下图是关于任务运行的数据流向图。
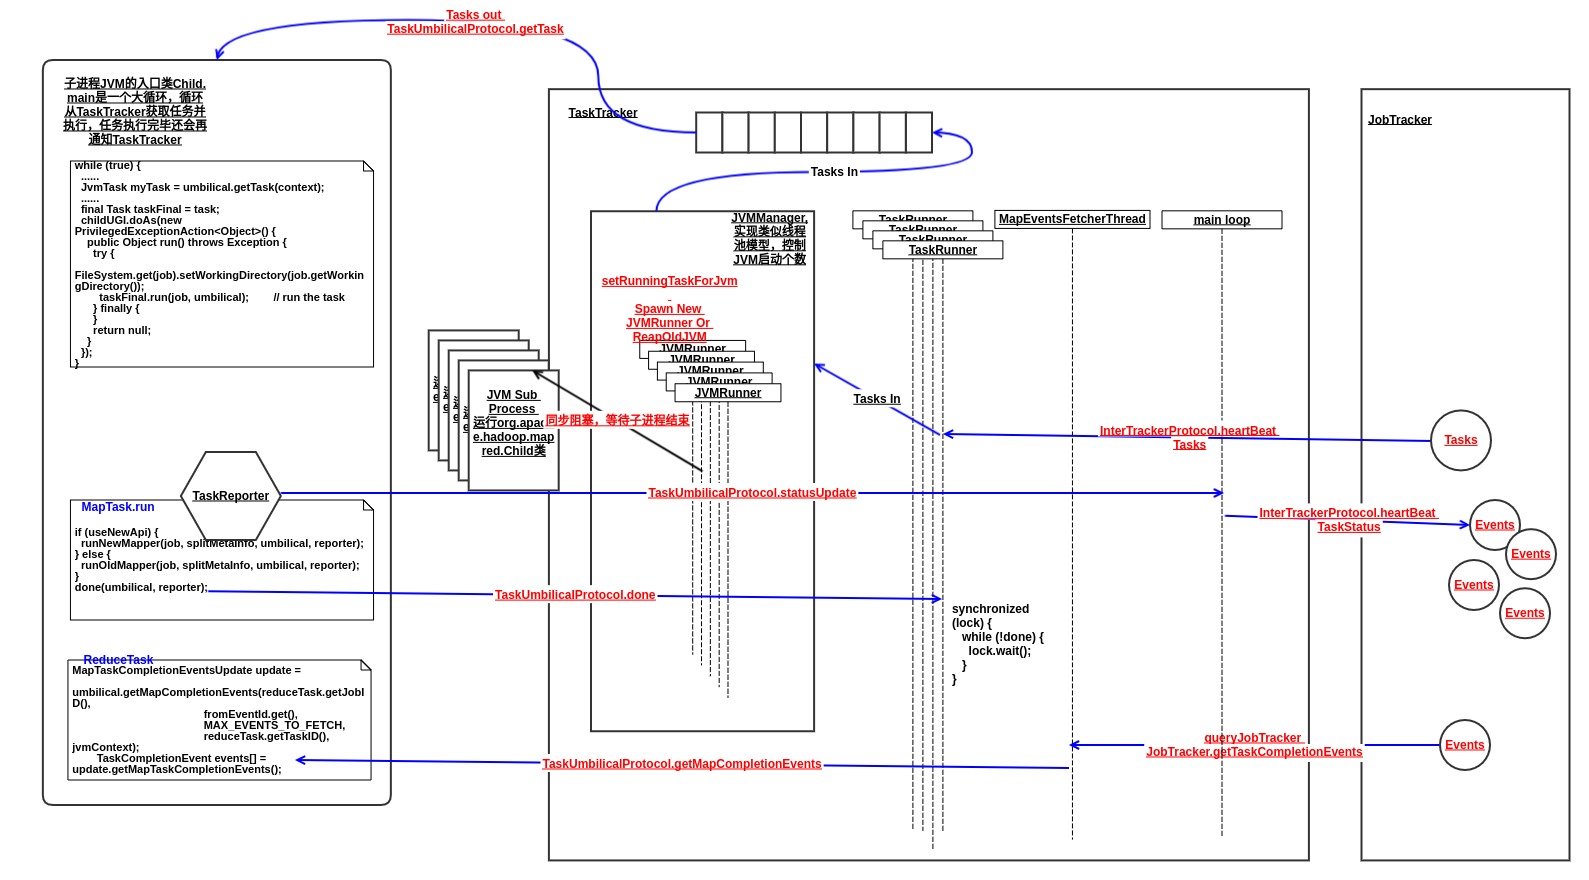
任务进度数据先通过每个Task中的 TaskReporter 线程循环上报给 TaskTracker, TaskTracker 再通过 heartBeat 上报给 JobTracker。
MapEvents数据的获取则是 TaskTracker 中的 MapEventsFetcherThread 通过 JobTracker.getTaskCompletionEvents 周期性从 JobTracker 获得的。ReduceTask 中的 GetMapEventsThread 线程也会周期性的调用 TaskTracker.getMapCompletionEvents RPC 来强制让 TaskTracker 从 JobTracker 获取Events。
JvmManager 实现了JVM复用,也就是多个任务可以复用同一个虚拟机。这里注意的是,不同Job的Task是不能复用同一个虚拟机的,当出现新Job的时候,如果正在运行的虚拟机没有运行过该Job的任务,则需要新建虚拟机。
当且仅当 1. 含有运行该Job任务的虚拟机;2.虚拟机不忙,3. 虚拟机没有把分配给自己该Job的所有Tasks运行完,则复用虚拟机。
以下两种情况需要杀死虚拟机: 1. 虚拟机运行过该Job的Tasks且全部运行完毕。 2. 当前分配的Task所属Job并不是该虚拟机所属Job。
private synchronized void reapJvm(
    TaskRunner t, JvmEnv env) throws IOException, InterruptedException {
  if (t.getTaskInProgress().wasKilled()) {
    //the task was killed in-flight
    //no need to do the rest of the operations
    return;
  }
  boolean spawnNewJvm = false;
  JobID jobId = t.getTask().getJobID();
  //Check whether there is a free slot to start a new JVM.
  //,or, Kill a (idle) JVM and launch a new one
  //When this method is called, we *must*
  // (1) spawn a new JVM (if we are below the max)
  // (2) find an idle JVM (that belongs to the same job), or,
  // (3) kill an idle JVM (from a different job)
  // (the order of return is in the order above)
  int numJvmsSpawned = jvmIdToRunner.size();
  JvmRunner runnerToKill = null;
  if (numJvmsSpawned >= maxJvms) {
    //go through the list of JVMs for all jobs.
    Iterator<Map.Entry<JVMId, JvmRunner>> jvmIter =
      jvmIdToRunner.entrySet().iterator();

    while (jvmIter.hasNext()) {
      JvmRunner jvmRunner = jvmIter.next().getValue();
      JobID jId = jvmRunner.jvmId.getJobId();
      //look for a free JVM for this job; if one exists then just break
      if (jId.equals(jobId) && !jvmRunner.isBusy() && !jvmRunner.ranAll()){
        setRunningTaskForJvm(jvmRunner.jvmId, t); //reserve the JVM
        LOG.info("No new JVM spawned for jobId/taskid: " +
                  jobId+"/"+t.getTask().getTaskID() +
                  ". Attempting to reuse: " + jvmRunner.jvmId);
        return;
      }
      //Cases when a JVM is killed:
      // (1) the JVM under consideration belongs to the same job
      //     (passed in the argument). In this case, kill only when
      //     the JVM ran all the tasks it was scheduled to run (in terms
      //     of count).
      // (2) the JVM under consideration belongs to a different job and is
      //     currently not busy
      //But in both the above cases, we see if we can assign the current
      //task to an idle JVM (hence we continue the loop even on a match)
      if ((jId.equals(jobId) && jvmRunner.ranAll()) ||
          (!jId.equals(jobId) && !jvmRunner.isBusy())) {
        runnerToKill = jvmRunner;
        spawnNewJvm = true;
      }
    }
  } else {
    spawnNewJvm = true;
  }

  if (spawnNewJvm) {
    if (runnerToKill != null) {
      killJvmRunner(runnerToKill);
    }
    spawnNewJvm(jobId, env, t);
    return;
  }
}
Task
JVM 能够复用运行多个Task,其实是因为 JVM 入口类 Child 是通过循环从 TaskTracker 获取Task的,这是 JVM 能够复用的原因。
// Child.main
while (true) {
  ......
  JvmTask myTask = umbilical.getTask(context);
  ......
  final Task taskFinal = task;
  childUGI.doAs(new PrivilegedExceptionAction<Object>() {
    public Object run() throws Exception {
      try {
        // use job-specified working directory
        FileSystem.get(job).setWorkingDirectory(job.getWorkingDirectory());
        taskFinal.run(job, umbilical);        // run the task
      } finally {
      }
      return null;
    }
  });
}
ReduceTask
ReduceTask 和 MapTask 在JVM中的运行的时机其实是没有先后顺序的,可能ReduceTask先进入JVM运行。这是由调度器来决定的,默认调度器是在 Job 的MapTask 完成一定数目后才开始调度ReduceTask。也就是说,当设置的不是所有的MapTask完成以后再调度ReduceTask的话,ReduceTask 就可能在某些MapTask 之前先进入JVM运行起来。
框架代码中 ReduceTask类 的 run 方法分成三个阶段,copy,sort,reduce,其中的 copy 就是 shuffle 阶段。MapTask 和 ReduceTask 的协调工作(Reduce需要等待MapTask完成才能运行)并不是在虚拟机层面的控制(所有MapTask任务运行完才启动ReduceTask虚拟机来运行ReduceTask,这里对于虚拟机而言,任务类型对虚拟机控制代码JVMManager是透明的,不管是什么任务,虚拟机有空闲就会直接获取并运行),而是由 ReduceTask 类自己控制完成,其实就是 ReduceTask 会有一个在虚拟机等待的过程,而不是在虚拟机子进程外面等待数据拷贝完成,然后进入虚拟机就直接处理数据计算。
// ReduceTask.run
boolean isLocal = "local".equals(job.get("mapred.job.tracker", "local"));
if (!isLocal) {
  reduceCopier = new ReduceCopier(umbilical, job, reporter);
  if (!reduceCopier.fetchOutputs()) {
    if(reduceCopier.mergeThrowable instanceof FSError) {
      throw (FSError)reduceCopier.mergeThrowable;
    }
    throw new IOException("Task: " + getTaskID() +
        " - The reduce copier failed", reduceCopier.mergeThrowable);
  }
}
copyPhase.complete();                         // copy is already complete
setPhase(TaskStatus.Phase.SORT);
statusUpdate(umbilical);

final FileSystem rfs = FileSystem.getLocal(job).getRaw();
RawKeyValueIterator rIter = isLocal
  ? Merger.merge(job, rfs, job.getMapOutputKeyClass(),
      job.getMapOutputValueClass(), codec, getMapFiles(rfs, true),
      !conf.getKeepFailedTaskFiles(), job.getInt("io.sort.factor", 100),
      new Path(getTaskID().toString()), job.getOutputKeyComparator(),
      reporter, spilledRecordsCounter, null)
  : reduceCopier.createKVIterator(job, rfs, reporter);

// free up the data structures
mapOutputFilesOnDisk.clear();

sortPhase.complete();                         // sort is complete
setPhase(TaskStatus.Phase.REDUCE);
statusUpdate(umbilical);
Class keyClass = job.getMapOutputKeyClass();
Class valueClass = job.getMapOutputValueClass();
RawComparator comparator = job.getOutputValueGroupingComparator();
ReduceTask 虽然在JVM中运行起来了,但是 reduceCopier.fetchOutputs() 是一个阻塞同步函数,该函数会因为 copiedMapOutputs.size() < numMaps 而阻塞,循环等待直到所有map输出文件拷贝完成。
也就是说,如果MapTask耗时很多的话JVM有限的情况下,在运行ReduceTask的JVM可能会出现都在阻塞的现象,造成新提交的MapTask无法使用JVM运行。
TaskTracker 并没有通过细粒度控制 MapTask和ReduceTask的执行关系,而是直接扔给JVMManager去执行,ReduceTask对MapTask的依赖关系,还可以将ReduceTask中关于等待MapTask的代码抽离出来,通过单独控制先调度MapTask执行,当所有MapTask的输出文件都下载准备好以后,再调度ReduceTask 去执行。 Hadoop 则采用的是由 ReduceTask 自己来维护这种依赖关系,每个ReduceTask只要知道自己需要等待哪些MapTask就行了,这样更加简单明确一些。如果单独抽离出来,则需要维护所有ReduceTask和MapTask的依赖关系,并且需要在父进程中下载和准备数据,这样虽然能够更好的利用资源,不会让虚拟机出现空等Map的过程,但是也会对父进程造成压力,同时代码不够简单明确。
shuffle 阶段分析
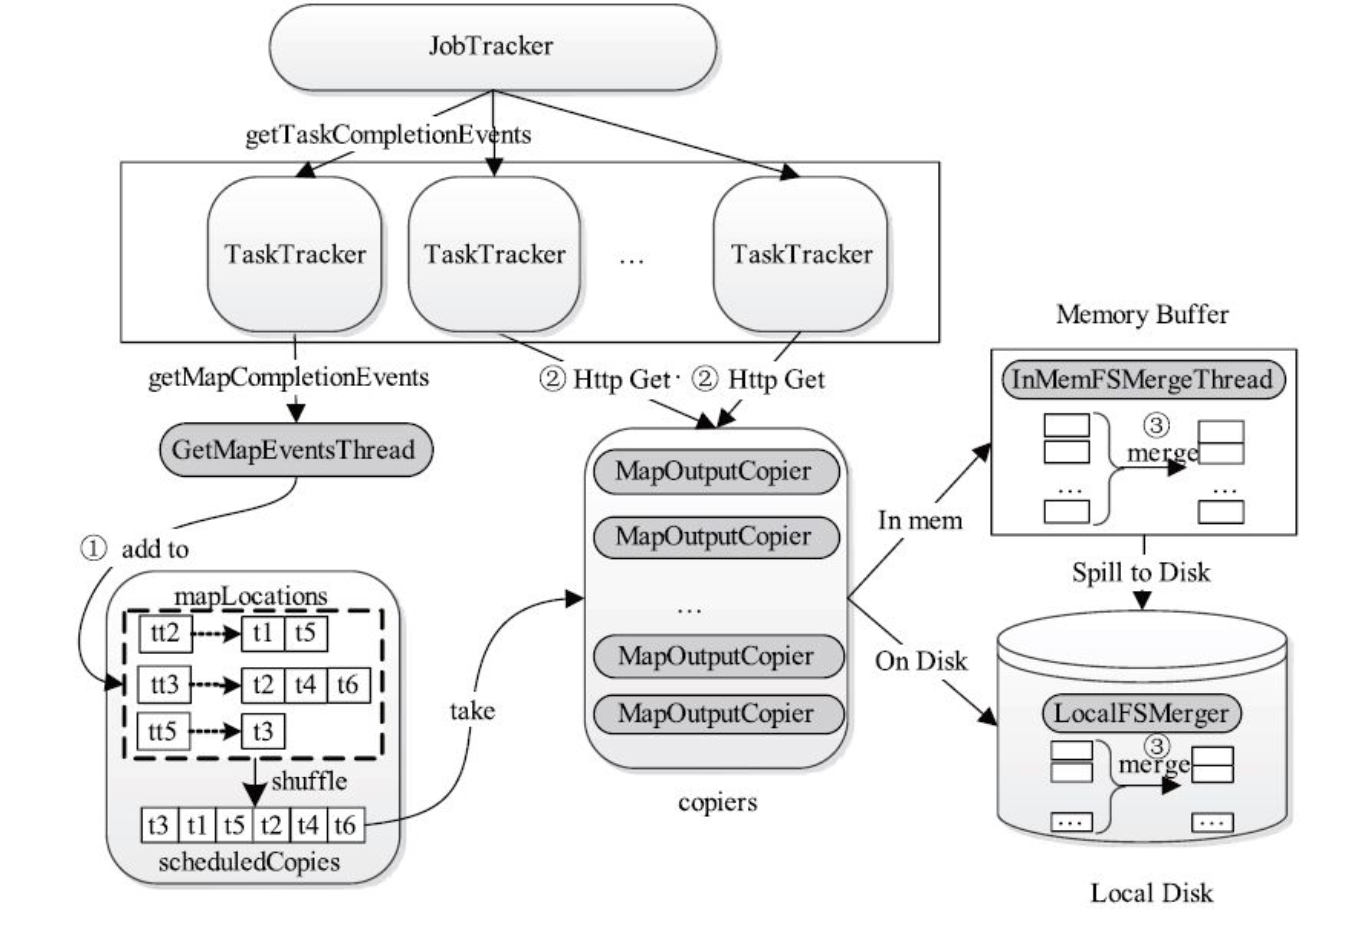
ReduceTask 通过 ReduceCopier 来负责做reduce前的数据准备。ReduceCopier 中有两组生产者消费者模型,并行的下载MapOutput数据和合并数据。
第一组是 GetMapEventsThread 和 MapOutputCopier, 通过元数据消费数据 scheduledCopies 来进行协作。第二组是 MapOutputCopier 和 InMemFSMergeThread/LocalFSMerger, 分别通过ShuffleRamManager.dataAvailable 和 mapOutputFilesOnDisk 协调控制MapOutput数据的生产消费。shuffle过程如下图所示:
GetMapEventsThread 和 MapOutputCopier
MapOutputCopier 是消费者,Reduce Task同时启动mapred.reduce.parallel.copies( 默认是5) 个数据拷贝线程MapOutputCopier。 该线程从scheduledCopies列表中获取Map Task数据输出描述对象, 并利用HTTP Get从对应的TaskTracker远程拷贝数据, 如果数据分片大小超过一定阈值, 则将数据临时写到工作目录下, 否则直接保存到内存中。 不管是保存到内存中还是磁盘上, MapOutputCopier均会保存一个MapOutput对象描述数据的元信息。 如果数据被保存到内存中, 则将该对象添加到列表mapOutputsFilesInMemory中, 否则将该对象保存到列
表mapOutputFilesOnDisk中。
GetMapEventsThread线程周期性通过RPC从TaskTracker获取已完成Map Task列表, 并保存到映射表mapLocations(保存了TaskTracker Host与已完成任务列表的映射关系) 中。 为防止出现网络热点, Reduce Task通过对所有TaskTracker Host进行“混洗”操作以打乱数据拷贝顺序, 并将调整后的Map Task输出数据位置保存到scheduledCopies列表中。
TaskTracker自己通过其 MapEventsFetcherThread 线程从 JobTracker 周期性获得MapEvents。当Task主动调用RPC TaskTracker.getMapCompletionEvents 的时候,TaskTracker会强制唤醒查询JobTracker获取MapEvents.
// MapEventsFetcherThread run loop
while (running) {
  try {
    List <FetchStatus> fList = null;
    synchronized (runningJobs) {
      while (((fList = reducesInShuffle()).size()) == 0) {
        runningJobs.wait();
      }
    }
    // now fetch all the map task events for all the reduce tasks
    // possibly belonging to different jobs
    boolean fetchAgain = false; //flag signifying whether we want to fetch
                                //immediately again.
    for (FetchStatus f : fList) {
      long currentTime = System.currentTimeMillis();
      //the method below will return true when we have not
      //fetched all available events yet
      if (f.fetchMapCompletionEvents(currentTime)) {
         fetchAgain = true;
      }
      if (!running) {
        break;
      }
    }
    synchronized (waitingOn) {
      if (!fetchAgain) {
        waitingOn.wait(heartbeatInterval);
      }
    }
}

// FetchStatus.fetchMapCompletionEvents
public boolean fetchMapCompletionEvents(long currTime) throws IOException {
  .....
  synchronized (fromEventId) {
    currFromEventId = fromEventId.get();
    List <TaskCompletionEvent> recentMapEvents =
      queryJobTracker(fromEventId, jobId, jobClient);
    synchronized (allMapEvents) {
      allMapEvents.addAll(recentMapEvents);
    }
    lastFetchTime = currTime;
    if (fromEventId.get() - currFromEventId >= probe_sample_size) {
      //return true when we have fetched the full payload, indicating
      //that we should fetch again immediately (there might be more to
      //fetch
      fetchAgain = true;
      return true;
    }
  }
  fetchAgain = false;
  ......
}


// TaskTracker.queryJobTracker

private List<TaskCompletionEvent> queryJobTracker(IntWritable fromEventId,
                                                  JobID jobId,
                                                  InterTrackerProtocol jobClient)
  throws IOException {

  TaskCompletionEvent t[] = jobClient.getTaskCompletionEvents(
                                                              jobId,
                                                              fromEventId.get(),
                                                              probe_sample_size);
  //we are interested in map task completion events only. So store
  //only those
  List <TaskCompletionEvent> recentMapEvents =
    new ArrayList<TaskCompletionEvent>();
  for (int i = 0; i < t.length; i++) {
    if (t[i].isMap) {
      recentMapEvents.add(t[i]);
    }
  }
  fromEventId.set(fromEventId.get() + t.length);
  return recentMapEvents;
}
ReduceTask 通过生产者线程 GetMapEventsThread 中的RPC调用 umbilical.getMapCompletionEvents 从TaskTracker获取已完成MapTask的完成事件,获取已经完成的MapTask的数据输出位置,为消费者 MapOutputCopier发出消费信号。 为防止出现网络热点, Reduce Task通过对所有TaskTracker Host进行“混洗”操作以打乱数据拷贝顺序, 并将调整后的Map Task输出数据位置保存到scheduledCopies列表中。
// 生产者
MapTaskCompletionEventsUpdate update =
          umbilical.getMapCompletionEvents(reduceTask.getJobID(),
                                           fromEventId.get(),
                                           MAX_EVENTS_TO_FETCH,
                                           reduceTask.getTaskID(), jvmContext);
TaskCompletionEvent events[] = update.getMapTaskCompletionEvents();
......
for (TaskCompletionEvent event : events) {
  switch (event.getTaskStatus()) {
    case SUCCEEDED:
    {
      URI u = URI.create(event.getTaskTrackerHttp());
      String host = u.getHost();
      TaskAttemptID taskId = event.getTaskAttemptId();
      URL mapOutputLocation = new URL(event.getTaskTrackerHttp() +
                              "/mapOutput?job=" + taskId.getJobID() +
                              "&map=" + taskId +
                              "&reduce=" + getPartition());
      List<MapOutputLocation> loc = mapLocations.get(host);
      if (loc == null) {
        loc = Collections.synchronizedList
          (new LinkedList<MapOutputLocation>());
        mapLocations.put(host, loc);
        }
      loc.add(new MapOutputLocation(taskId, host, mapOutputLocation));
      numNewMaps ++;
    }
......
  }
}

// TaskTracker.getMapCompletionEvents --> FetchStatus.getMapEvents
public TaskCompletionEvent[] getMapEvents(int fromId, int max) {
  synchronized (allMapEvents) {
    if (allMapEvents.size() > fromId) {
      int actualMax = Math.min(max, (allMapEvents.size() - fromId));
      List <TaskCompletionEvent> eventSublist =
        allMapEvents.subList(fromId, actualMax + fromId);
      mapEvents = eventSublist.toArray(mapEvents);
    } else {
      // Notify Fetcher thread.
      notifyFetcher = true;
    }
  }
  if (notifyFetcher) {
  synchronized (waitingOn) {
    waitingOn.notify();
  }
}
// 消费者
while (true) {
  ......
  MapOutputLocation loc = null;
  long size = -1;
  synchronized (scheduledCopies) {
    while (scheduledCopies.isEmpty()) {
      scheduledCopies.wait();
    }
    loc = scheduledCopies.remove(0);
  }
  ......
  shuffleClientMetrics.threadBusy();
  start(loc);
  size = copyOutput(loc);
  shuffleClientMetrics.successFetch();
}
MapOutputCopier 和 InMemFSMergeThread/LocalFSMerger
第二组是 MapOutputCopier 生产者 和 InMemFSMergeThread/LocalFSMerger 消费者, 分别通过ShuffleRamManager.dataAvailable 和 mapOutputFilesOnDisk 协调控制MapOutput数据的生产消费。
生产者给 InMemFSMergeThread 和 LocalFSMerger 发送信号
private long copyOutput(MapOutputLocation loc
                              ) throws IOException, InterruptedException {
  ......
  // Copy the map output
  MapOutput mapOutput = getMapOutput(loc, tmpMapOutput,
                                      reduceId.getTaskID().getId());

    // Process map-output
    if (mapOutput.inMemory) {
      // Save it in the synchronized list of map-outputs
      mapOutputsFilesInMemory.add(mapOutput);
    } else {
    ......
      synchronized (mapOutputFilesOnDisk) {
        addToMapOutputFilesOnDisk(localFileSys.getFileStatus(filename));
      }
    }
}


private MapOutput getMapOutput(MapOutputLocation mapOutputLoc,
                                     Path filename, int reduce){
  ......
  boolean shuffleInMemory = ramManager.canFitInMemory(decompressedLength);
  // Shuffle
  MapOutput mapOutput = null;
  if (shuffleInMemory) {
    mapOutput = shuffleInMemory(mapOutputLoc, connection, input,
                                (int)decompressedLength,
                                (int)compressedLength);
  } else {
    mapOutput = shuffleToDisk(mapOutputLoc, input, filename,
        compressedLength);
  }
}
private MapOutput shuffleInMemory(MapOutputLocation mapOutputLoc,
                                        URLConnection connection,
                                        InputStream input,
                                        int mapOutputLength,
                                        int compressedLength)
      throws IOException, InterruptedException {
  // Reserve ram for the map-output
  boolean createdNow = ramManager.reserve(mapOutputLength, input);
......
  // Inform the ram-manager
  ramManager.closeInMemoryFile(mapOutputLength);
  ramManager.unreserve(mapOutputLength);
}
TaskReporter 和 Progress
在任务运行过程中, 为了能够让JobTracker获取任务执行进度Progress, 各个任务会创建一个进度汇报线程Reporter, 只要任务处理一条新数据, 该线程将通过RPC告知TaskTracker, 并由TaskTracker通过心跳(心跳中带有TaskStatus数据)进一步告诉JobTracker。
// TaskReporter 线程
 public void run() {
  final int MAX_RETRIES = 3;
  int remainingRetries = MAX_RETRIES;
  // get current flag value and reset it as well
  boolean sendProgress = resetProgressFlag();
  while (!taskDone.get()) {
    synchronized(lock) {
      done = false;
    }
......
    if (sendProgress) {
      // we need to send progress update
      updateCounters();
      taskStatus.statusUpdate(taskProgress.get(),
                              taskProgress.toString(),
                              counters);
      taskFound = umbilical.statusUpdate(taskId, taskStatus, jvmContext);
      taskStatus.clearStatus();
    }
    else {
      // send ping
      taskFound = umbilical.ping(taskId, jvmContext);
    }
....
  }
  //Notify that we are done with the work
  resetDoneFlag();
}
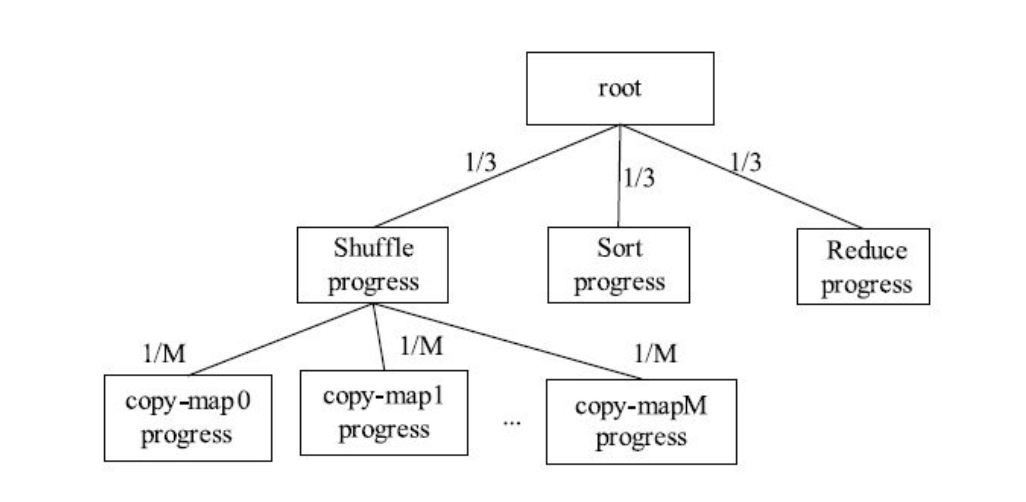
任务执行进度信息被封装到类Progress中, 且每个Progress实例以树的形式存在。 Hadoop采用了简单的线性模型计算每个阶段的进度值: 如果一个大阶段可被分解成若干个子阶段, 则可将大阶段看作一棵树的父节点, 而子阶段可看作父节点对应的子节点, 且大阶段的进度值可被均摊到各个子阶段中; 如果一个阶段不可再分解, 则该阶段进度值可表示成已读取数据量占总数据量的比例。
对于Map Task而言, 它作为一个大阶段不可再分解, 为了简便, 我们直接将已读取数据量占总数据量的比例作为任务当前执行进度值。
对于Reduce Task而言, 我们可将其分解成三个阶段: Shuffle、 Sort和Reduce, 每个阶段占任务总进度的1/3。 考虑到在Shuffle阶段, Reduce Task需从M(M为Map Task数目) 个Map Task上读取片数据, 因此, 可被分解成M个阶段, 每个阶段占Shuffle进度的1/M, 具体如图8-5所示。
任务进度由Progress类实现,该类递归定义了一个Progress,过程是一个树形结构,一个父过程可以分解成多个子过程,进而继续分解,每一个节点维护的是当前过程含有的子过程列表,当前运行第到几个子阶段,当前过程每个子过程进度比例(平均数),当前过程的父过程,当前进度。
public class Progress {
  private String status = "";
  private float progress;
  private int currentPhase;
  private ArrayList<Progress> phases = new ArrayList<Progress>();
  private Progress parent;
  private float progressPerPhase;

  /** Creates a new root node. */
  public Progress() {}

  /** Adds a named node to the tree. */
  public Progress addPhase(String status) {
    Progress phase = addPhase();
    phase.setStatus(status);
    return phase;
  }

  /** Adds a node to the tree. */
  public synchronized Progress addPhase() {
    Progress phase = new Progress();
    phases.add(phase);
    phase.parent = this;
    progressPerPhase = 1.0f / (float)phases.size();
    return phase;
  }

  /** Called during execution to move to the next phase at this level in the
   * tree. */
  public synchronized void startNextPhase() {
    currentPhase++;
  }

  /** Returns the current sub-node executing. */
  public synchronized Progress phase() {
    return phases.get(currentPhase);
  }

  /** Completes this node, moving the parent node to its next child. */
  public void complete() {
    // we have to traverse up to our parent, so be careful about locking.
    Progress myParent;
    synchronized(this) {
      progress = 1.0f;
      myParent = parent;
    }
    if (myParent != null) {
      // this will synchronize on the parent, so we make sure we release
      // our lock before getting the parent's, since we're traversing
      // against the normal traversal direction used by get() or toString().
      // We don't need transactional semantics, so we're OK doing this.
      myParent.startNextPhase();
    }
  }

  /** Called during execution on a leaf node to set its progress. */
  public synchronized void set(float progress) {
    this.progress = progress;
  }

  /** Returns the overall progress of the root. */
  // this method probably does not need to be synchronized as getINternal() is synchronized
  // and the node's parent never changes. Still, it doesn't hurt.
  public synchronized float get() {
    Progress node = this;
    while (node.parent != null) {                 // find the root
      node = parent;
    }
    return node.getInternal();
  }

  /** Computes progress in this node. */
  private synchronized float getInternal() {
    int phaseCount = phases.size();
    if (phaseCount != 0) {
      float subProgress =
        currentPhase < phaseCount ? phase().getInternal() : 0.0f;
      return progressPerPhase*(currentPhase + subProgress);
    } else {
      return progress;
    }
  }

  public synchronized void setStatus(String status) {
    this.status = status;
  }

  public String toString() {
    StringBuffer result = new StringBuffer();
    toString(result);
    return result.toString();
  }

  private synchronized void toString(StringBuffer buffer) {
    buffer.append(status);
    if (phases.size() != 0 && currentPhase < phases.size()) {
      buffer.append(" > ");
      phase().toString(buffer);
    }
  }

}
计算当前过程的运行进度的算法:
     /** Computes progress in this node. */
  private synchronized float getInternal() {
    int phaseCount = phases.size();
    if (phaseCount != 0) {
      float subProgress =
        currentPhase < phaseCount ? phase().getInternal() : 0.0f;
      return progressPerPhase*(currentPhase + subProgress);
    } else {
      return progress;
    }
  }